py-sandra
py-sandra: Cassandra GUI Client - User Documentation
Overview
The Cassandra GUI Client is a lightweight, web-based graphical interface for Apache Cassandra clusters. Built with Python and Streamlit, it allows developers and administrators to browse data, manage schemas, and perform CRUD operations without writing raw CQL queries.
Click to watch: py-sandra GUI Tutorial
Features
- Connection Management: Save and manage multiple connection profiles (Local, Remote, SSL).
- Schema Explorer: Browse Keyspaces and Tables dynamically.
- Data Grid: View table data with pagination and column filtering.
- CRUD Operations:
- Create: Dynamic forms generated based on table schema.
- Read: Filterable data grid.
- Update: Edit rows directly via the UI.
- Delete: Remove records with safety confirmation.
- CQL Editor: Execute custom CQL queries with result visualization.
- Type Support: Handles complex Cassandra types like
UUID,Map,List,Set, andTimestamp.
Installation
Prerequisites
- Python 3.12+
- A running Cassandra cluster (or compatible database like ScyllaDB)
- uv (fast Python package installer)
Setup
Source Code
- Clone the repository.
git clone https://github.com/yourusername/py-sandra.git cd py-sandra - Install dependencies:
uv venv --python 3.12 source .venv/bin/activate # On Windows: .venv\Scripts\activate uv sync - Running the Application
streamlit run src/main.pyThe application will open in your default web browser (usually at
http://localhost:8501).
Docker
docker run --name py-sandra --rm \
  --env PY_SANDRA_HOME=/etc/py-sandra --volume "/path/to/local/.py-sandra:/etc/py-sandra" \
  -p 8501:8501 py-sandra:latest
User Guide
1. Connection Management
Upon launching, the sidebar allows you to manage connections.
Creating a New Connection
- Expand the Manage Connections section in the sidebar.
- Fill in the connection details:
- Name: A friendly name for the profile.
- Hosts: Comma-separated IP addresses or hostnames (e.g.,
127.0.0.1). - Port: Cassandra native protocol port (default:
9042). - Username/Password: (Optional) For authentication.
- SSL Enabled: Check this if your cluster requires SSL.
- SSL Protocol: Select the specific protocol (e.g.,
PROTOCOL_TLSv1_2). - Cert Path: Path to the certificate file if required.
- SSL Protocol: Select the specific protocol (e.g.,
- Click Save Connection.
Connecting
- In the sidebar, select a profile from the Select Connection dropdown.
- Click Connect.
- Once connected, the Schema section will appear below.
2. Browsing Data
- Select Keyspace: Choose a keyspace from the dropdown.
- Select Table: Choose a table to view.
- Click Refresh to reload the schema if needed.
The main view will load the Data Browser tab by default.
Data Grid Features
- Pagination: Use the “Rows per page” selector to control grid size.
- Filtering: Use the text inputs at the top of the grid to filter by specific column values.
- Note: Filtering works best on indexed columns or partition keys.
- Selection: Click on a row to view details or edit it.
3. Editing Data (CRUD)
Inserting Records (experimental)
- Navigate to the Insert Record tab.
- The form is dynamically generated based on the table’s columns.
- UUIDs: Auto-generated if left empty.
- Collections (Maps/Lists): Specialized editors are provided.
- Click Insert Record.
Updating Records
- In the Data Browser tab, click on a row to select it.
- A detailed form will appear below the grid.
- Modify the values and click Update Record.
- Note: Primary Keys cannot be modified once inserted.
Deleting Records (experimental)
- Select a row in the Data Browser.
- Click the Delete Record button in the details view.
- Confirm the action in the dialog that appears.
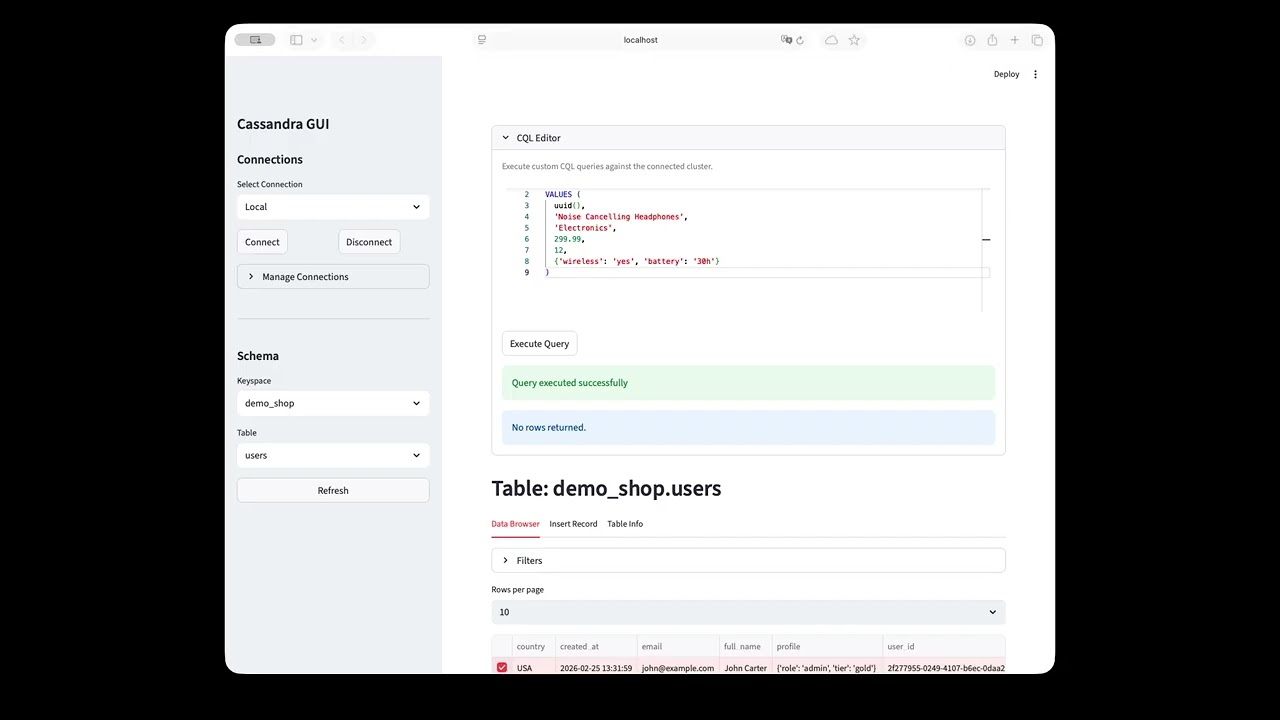
4. CQL Editor (experimental)
For advanced operations, use the CQL Editor tab.
- Enter your CQL query (e.g.,
SELECT * FROM my_table WHERE id = ...). - Toggle Extended Mode to view results in a detailed list format instead of a grid.
- Click Execute.
5. Table Info
The Table Info tab displays schema metadata:
- Column Names and Types.
- Partition and Clustering Key identification.
- Visibility Control: Check “Hide” to remove specific columns from the Data Browser view to declutter the interface.
Configuration
Application settings and connection profiles are stored locally in:
~/.py-sandra/config.json
You can override the configuration directory by setting the PY_SANDRA_HOME environment variable.